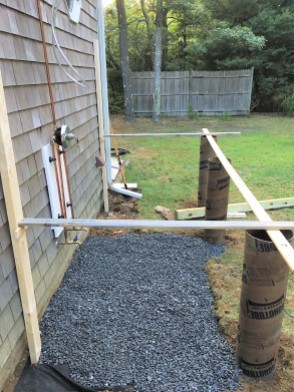
Like any construction project, the foundation is critically important. In the photos below, you will see how the dirt has been removed under the shower area. Note the large area cleared to the left of the shower, where I decided to install a small patio for the outdoor grill.
I dug 3 holes to pour cement footers for added stability. These footers will be used to support the three upright posts. However, cement footers are an optional feature; many outdoor showers are built with the posts sitting directly on the ground, on a flat cement paving stone, or on various kinds of rock particles like 1/2 inch bluestone, pea stone or some other aggregate.
In the photos below you can see the cardboard footer tubes. The tubes closest together frame the doorway. The boards connecting the tubes were used to ensure the tubes were placed the same distance from the wall and in a straight line with each other. You also can see the 1/2 inch bluestone, which I spread on top of a fabric weed barrier.
In the photo below, a 4″ X 4″ post has been placed horizontally on the ground, which will form the outer frame of the foundation.

In the photo below, the footer tubes have been cut down to ground level, ready for the cement to be poured into them. The entire shower base enclosure has been framed in with 4″ X 4″ lumber. The base of the shower measures 68″ long and 52″ wide.

Notice the horizantal 4″ X 4″ lumber in the bottom left of the photo above with the orange level resting on it. This piece of lumber will frame in the house foundation. I will be extending the 1/2″ bluestone into this area when I fill in the shower foundation. This is clearly optional work that I decided to do for this installation.


